This lab is done at NCSSM on a residential weekend. |
Goal
To verify that the acceleration of a system of objects depends on i) the mass of the system and ii) the net force on the system according to the predictions of Newton's 2nd Law
Introduction
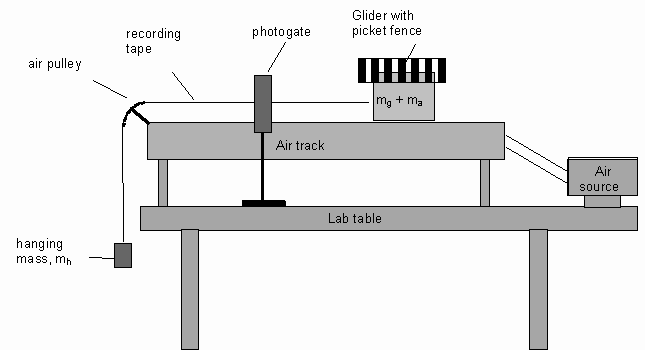
See the diagram below for reference. A glider of mass mg on a level air track is attached via recording tape to a mass mh that hangs over the end of the air track. An additional mass ma may be attached to the glider as the need arises. When the air is turned on, the tape slides with minimal friction over the air pulley; the hanging weight therefore accelerates the entire system of glider, hanging mass, and tape. The acceleration of the system is measured with a picket fence taped to the top of the glider. The picket fence is a Plexiglas strip divided into alternating dark and clear bars of equal width. When the strip moves through a photogate interfaced to a computer, time intervals are measured for the passage of successive dark bars through the gate. The raw data are then converted to a graph of velocity vs. time. This is an automated finite difference method.
The acceleration of the system is the dependent variable. There are two independent variables: the total mass of the system and the net force on the system. Since there are three variables, a two-part experiment will be done:
Part A. Acceleration of the system as a function of the total mass of the system. In this case, the net force on the system, the weight of the hanging mass, mhg, is kept constant.
Part B. Acceleration of the system as a function of the net force on the system. In this case, the total mass of the system is kept constant.
Note the emphasis on the system. In this experiment, the system is composed of the glider, any additional mass attached to the glider, the hanging mass, and the tape. All have the same acceleration as long as the tape doesn’t stretch. Thus, when we say acceleration, we mean the acceleration of the system. Similarly, the mass of the system is the sum of the masses of the objects. Since the tape has negligible mass in comparison to the glider, any additional mass, and the hanging mass, the mass of the system is taken to be msys = mh + mg+ ma.
The data will be analyzed by drawing graphs of the acceleration vs. the independent variable. The independent variables will be expressed as needed in order to apply linear fits in accordance with theoretical expectations. The coefficients of fit will be related to constants of the system.
Prelab
In order to be ready to participate in the lab, do the following by the due date/time posted in the Weekly Schedule.
-
Read the lab instructions completely.
-
Download this data table, which is in Excel format. Then prepare the data table by entering the following information in the spreadsheet. Note that the spreadsheet has tabs at the bottom for each part of the experiment. When you're finished entering information, save the file with the name L119-lastnamefirstinitial.xls. You'll submit this file as part of the L119PL assessment in step 3.
-
From reading the instructions for the Part A experiment, you should know in advance what the values of the hanging mass, additional mass, and net force will be. Enter these now in the corresponding columns of the Part A table.You'll need to format them with the appropriate number of decimal places. Do the following to select the number of decimal places: i) Click on the cell that you want to format, ii) Right click and select Format Cells, iii) Under the Number tab, select the Number category. Then select 3 for the number of decimal places. You can quickly copy this formatting to other cells by clicking on the cell whose format you want to copy, click on the paintbrush icon, then click on the cell to which you wish to copy the formatting.
-
From reading the instructions for the Part B experiment, you know in advance what the values of the hanging mass and net force will be. Enter these now in the corresponding columns of the Part B table. As for part a, format the entries with three decimal places.
-
-
Complete the L119PL assessment on WebAssign by the due date and time.
Setup and Method
Setup
The air track must be level and the photogate positioned so that all bars of the picket fence will pass unobstructed through the photogate before the falling mass strikes anything. The falling mass should be caught in a box of foam. For each set of parameters, three trials of the acceleration measurement will be taken.
Measure and record in your Excel data table the mass of the glider, including the picket fence, that will be used.
Set up the computer and interface as follows:
- Connect the photogate to digital line 1.
- Start Logger Pro. From the File->Experiment menu, open this file: Probes & Sensors\photogate\Motion Timer Pckt Fnc-spl.cmbl.
- Double-click on the graph and change both scales to Autoscale from 0.
- Position the glider and picket fence behind the photogate, turn on the air supply, and click Collect on the Logger Pro menu. When the Collect button changes from green to red, release the glider. Make sure you're not touching the glider as it first passes through the photogate. Catch the glider before it hits the end of the track.
- After the glider passes through the photogate, stop data collection. Then select Analyze->Linear Fit from the menu. Record the slope of the fit as the acceleration.
- You don't have to clear the data for another run. The data will clear automatically, and the linear fit will be performed automatically.
Other things to watch out for:
- Position the photogate so that only the bars of the picket fence obstruct the gate.
- Tape the recording tape on the picket fence so that the recording tape will be horizontal.
Method
Each lab group will be assigned either Part A or Part B to do. You won't know until the beginning of the lab period which part you'll be assigned. Therefore, be ready to do either part. Each student must record data in their own spreadsheet. Start with the spreadsheet that you prepared for the prelab (or that you corrected based on the instructor's feedback).
Part A. The independent variable is the system mass. The hanging mass will be 0.100 kg and will be the same throughout the experiment. For the first data collection of 3 trials, attach no additional masses to the glider. After the initial run of 3 trials, tape 0.050 kg to the glider on the center of one side of the glider. Again make 3 measurements of the acceleration. Repeat this process (taping an additional 0.050 kg to the glider and measuring the acceleration 3 times) three more times (i.e., you will make a total of 15 measurements). Distribute the taped masses uniformly (so that the glider remains balanced—why is this important?) during each new run. Record all data in your Excel table.
Part B. The independent variable is the net force on the system. Keep the system mass constant throughout the entire experiment. The initial hanging mass will be a 0.020-kg mass. Distribute 4 additional 0.020-kg masses evenly on the sides of the glider. After an initial run of 3 trials with the single 0.020-kg hanging mass, remove 0.020 kg from the glider and add it to the hanging mass. Again make 3 measurements of the acceleration. Repeat this process (moving 0.020 kg from the glider to the hanging mass and measuring the acceleration 3 times) three more times (i.e., you will make a total of 15 measurements). For all trials be sure the masses remaining on the glider are uniformly distributed. Record all data in your Excel table.
Calculations in Excel
You can enter formulas into Excel to do calculations quickly. We describe how below, using the the first set of 3 trials as an example. Ask the instructor for help as needed.
-
In order to calculate the mean of a mean of three accelerations, first click in the cell where you want the mean to appear. Let's say the cell is G12. Then type an equal sign. This tells Excel that you're going to write a formula. After the equal sign, type AVERAGE( . Then with your mouse, click and drag on the three cells whose acceleration you want to average. Release the mouse and hit the return key to calculate the average. The formula that appears in the window at the top of the spreadsheet should be fx =SUM(G9:G11).
-
In order to calculate a deviation, click in the cell where you want the deviation to appear, say H9. Type an equal sign followed by ABS( . Click on the cell to the left that has the value of the acceleration, type the minus sign, and then click on the mean of the three accelerations. Hit return to calculate the deviation. The formula should read fx =ABS(G9-G12). Next, you'll need to make the row of G12 an absolute reference to be used in calculating the other two deviations. Do this simply by typing a dollar sign, $, in front of the row number 12. The formula will then appear as follows: fx =ABS(G9-G$12). Finally, to calculate the other two deviations, click in cell H9, move your mouse to the lower right-hand corner of the cell until the cursor changes to a solid cross. Then click and drag down two cells. When you release the mouse, the value of the remaining two deviations will be calculated.
-
You can quickly calculate the mean of a set of three deviations by clicking on the mean of the corresponding accelerations, move your mouse to lower right-hand corner of the cell to obtain the solid cross, and then dragging to the cell to the right.
-
Next calculate the Percentage Mean Deviation. Click on cell I12 and type an equal sign followed by 100*(. Click on the mean deviation in the cell to the left, H12, type the division symbol /, then click on the mean acceleration in cell G12. Hit return to perform the calculation. The formula should read fx =100*H12/G12.
-
Format the cells that you just calculated with the appropriate number of decimal places. Deviations and means will have the same number of decimal places as the accelerations. For the Percentage Mean Deviation, use the rules for significant figures to determine the proper number of significant figures.
-
Check your calculations mentally to make sure that they make sense and that When you're confident that Excel is doing the calculations the way that you want them to be done, do the remaining calculations. Format all entries appropriately.
-
Compare your spreadsheet to that of your partner's. Resolve any differences.
-
The instructor will show you how to enter formulas in Excel to automatically calculate means and deviations. When you've completed all calculations and reformatting, upload your file to the WebAssign item, L119R. Then continue with the analysis below.
Analysis
|
|
Work with your partner to do the analysis for the experiment that was assigned you. You'll prepare one Logger Pro file together.
-
Create a new Logger Pro file and save it with the filename L119_lastnamefirstinitial.cmbl. Input values of the independent variable and the mean acceleration to the LP data table. Plot a graph of acceleration vs. the independent variable.
-
In L119PL, you selected the relationship between acceleration and the independent variable that you thought was appropriate. Discuss your choice with your partner. Then discuss whether and how to re-express the independent variable so that a graph of acceleration vs. this re-expressed variable will be linear. If necessary, create a new calculated column for the re-expressed variable. Label it descriptively. Then carry out a linear fit between the acceleration and the independent variable (re-expressed if necessary).
-
Create a column for the % Mean Deviation. Then add error bars to the graph to display the % Mean Deviation.
-
In the text box, construct the matching table. If you re-expressed a variable, pay special attention to the form of the variable and its units. If you're not sure what the expected values should be, see the next step.
-
Below the table, write the corresponding physics equation. This is the equation of fit. Compare it to the theoretical (textbook) equation that you expect for this situation. (You dealt with this in the prelab.) This should help you see what the expected values of slope and intercept are for your fit.
-
Create a new page, label both pages descriptively, and then answer the questions to follow on the new page.
-
Calculate the experimental error between the slope and its expected value. Use the expected value as accepted.
-
Calculate and plot the residuals of the fit.
-
How good is the fit? Justify your answer based on the residuals (are they random?) and how closely the line of fit intersects the error bars.
-
Distribute copies of the completed analysis file to both lab partners. Both partners must upload the file to the WebAssign item, L119R, in order to receive credit for the analysis.
Presenting the results of the analysis
In order that all students can see the results of both Parts A and B analyses, the teacher will select some of the lab groups to present their results to the class.